
What to do with a pile of driftwood collected by my pineapple-loving friend and me as we strolled along a spectacular, palm fringed, tropical island beach many months ago?
In a few weeks time, MLP and I move house ... and state. I can't move a pile of driftwood! I've got to do something with it ... or ... it has to go.
Doesn't everyone have piles of driftwood languishing in their garage?? Waiting to be transformed??


At this stage, I could have attached the wood to a backing board for a two dimensional driftwood Christmas tree, which would have looked great, but it wasn't what I was after.
I had some nylon twine which felt strong enough for my purpose. I marked the centre of each piece of driftwood using my carpenter's ruler and pencil ...


And the remainder of the driftwood? Well, it will have to go. There will be other beaches and other driftwood should the need arise.
But then, last weekend, while back on that same magical tropical island for a final farewell visit, I spy this ...

a much twiggier, but very similar driftwood wind thingie joined together by fishing line.
Jayne, my milliner friend, who whiles away her days on this spectacular island, says,"If you were to turn that upside down it could be a Christmas tree, don't you think?"
I smile and say, "That's what I've just written my next blog post about."
Obviously, the island air has lots of people thinking the same way as me. Magic.
The initial intention was to turn said driftwood into a large, triangularly shaped, spinning wind thingie. And I still like that concept. But, then, in my early morning ponderings, I had a thought ... an intriguing thought ... What about a hanging driftwood Christmas tree?
And ... if it had hanging loops on both ends ... it could be a Christmas tree at Christmas time (Now there's a novel idea!) and, when turned up the other way, a small, triangularly shaped, spinning wind thingie for the remainder of the year!?! Great idea!
I'm often amazed by the concepts born out of early morning ponderings.
And, so, the hanging driftwood Christmas tree concept emerged out of a pile of driftwood.
But, how did this unruly pile become a final product?
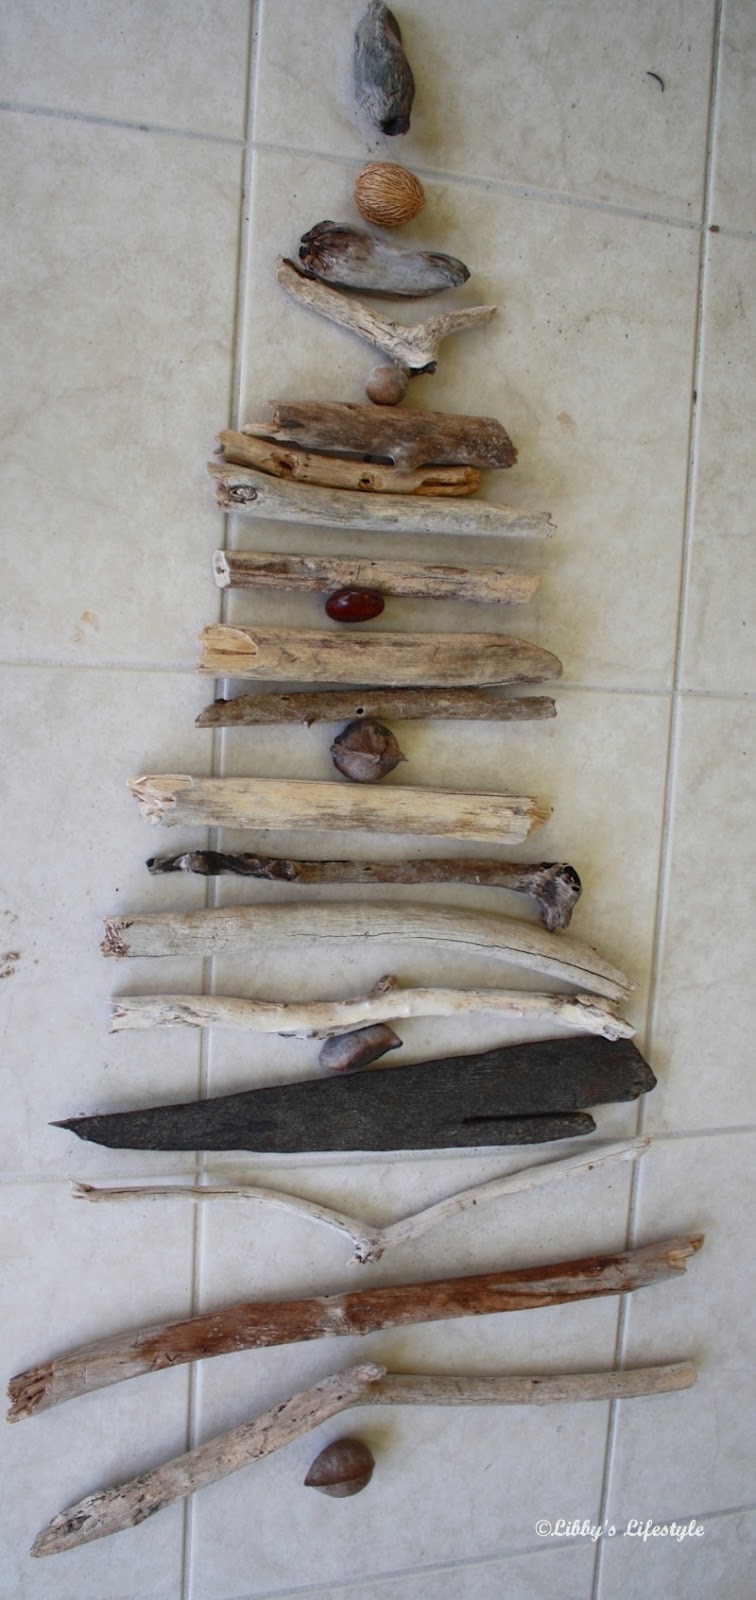
I selected wood in diminishing lengths and lay them out on the floor, fiddled around until I was happy with the aesthetics, inserted some seeds to break up the look, then found my trusty drill.
At this stage, I could have attached the wood to a backing board for a two dimensional driftwood Christmas tree, which would have looked great, but it wasn't what I was after.
I had some nylon twine which felt strong enough for my purpose. I marked the centre of each piece of driftwood using my carpenter's ruler and pencil ...
and drilled appropriately sized holes in every piece and every seed.
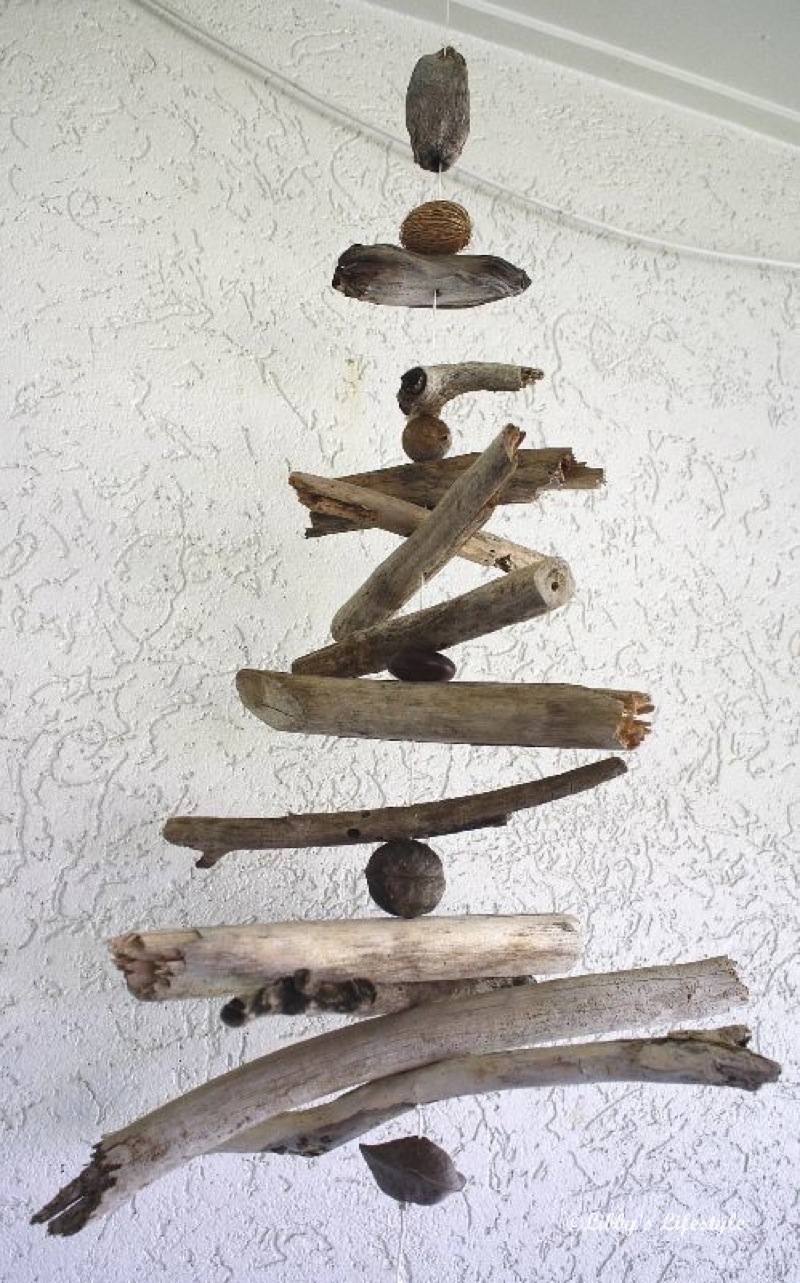
Now, it was just a matter of threading the twine through.
After some contemplation, I realised I would also like some knots here and there to keep some pieces separate from others. So, I estimated the final length of twine required, added about another half a metre and started threading.
After some contemplation, I realised I would also like some knots here and there to keep some pieces separate from others. So, I estimated the final length of twine required, added about another half a metre and started threading.
When I reached a spot where I wanted a knot, I pulled the twine all the way through, then tied an over-and-over-and-over knot (Very technical knot name!), hoping that it wouldn't slip through my drilled hole. And it worked! Yeah!
Once I was through all bits of driftwood and all seeds, I did a trial hang.
Darn! A few of my favourite bits were hanging all higgledy-piggledy, not nicely balanced at all. Puke!
Darn! A few of my favourite bits were hanging all higgledy-piggledy, not nicely balanced at all. Puke!
I just couldn't get them to balance nicely. I tried!
So, some knots were undone and some pieces removed.
Hence, my final Christmas tree is a little shorter than the one that was on the floor initially.
But, I'm still happy. It looks as I imagined. It twirls in the breeze. I can imagine it with fairy light at night. (Sorry, no fairy light photo as mine are packed away ready for the move ... maybe next Christmas, I can show a fairy-light-festooned, hanging driftwood Christmas tree photo?)
But, I'm still happy. It looks as I imagined. It twirls in the breeze. I can imagine it with fairy light at night. (Sorry, no fairy light photo as mine are packed away ready for the move ... maybe next Christmas, I can show a fairy-light-festooned, hanging driftwood Christmas tree photo?)
But, for now, these will have to suffice.
A couple of hours work and there you have it ... my hanging driftwood Christmas tree ... come ... small triangularly shaped spinning wind thingie ... a memory of beach walks, friendship, palm trees, tropical islands.
Every home should have one ... or two ... or three ... I think.
And the remainder of the driftwood? Well, it will have to go. There will be other beaches and other driftwood should the need arise.
But then, last weekend, while back on that same magical tropical island for a final farewell visit, I spy this ...

Jayne, my milliner friend, who whiles away her days on this spectacular island, says,"If you were to turn that upside down it could be a Christmas tree, don't you think?"
I smile and say, "That's what I've just written my next blog post about."
Obviously, the island air has lots of people thinking the same way as me. Magic.
Linking up with
http://rainonatinroof.com
Thanks for reading my blog post. I'd love it if you'd leave a comment below for me to read.


Social Icons